SwitchTake Mobile / Record & Edit
- Get video camera ready to record
- Open SwitchTake mobile app
- Tap New Recording
- Enter Edit Session Name (not required)
- Click Start
- Wait for countdown
- Click Record on your camera
- Swipe/tap to make live edits
- Click Save
All edits in the edit session are saved and will be used to generate the import sequence for your video software.
|
Swipe to Edit
| |
|
|

SWIPE UP
Keep everything since the last swipe
|

SWIPE DOWN
Cut everything since the last swipe
|
|

CHECKPOINTS
Each swipe creates a checkpoint. Allowing you to decide to keep or cut after the checkpoint.
|

SAVE EDIT SESSION
When you are done recording, click the green save button in the upper right corner of the SwitchTake screen. |
|
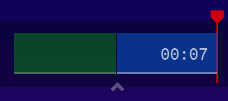
SwitchTake Edit Timeline

Blue
The blue part shows the amount of time from the last checkpoint / swipe. Swipe down / up to cut or include this section. |
Green
Shows areas that will be included in your sequence. |
Red Clip
Shows areas that will be cut for your sequence. |
Time
Time on the right is the total time of your sequence. The time to the left of the red line shows the length of time for the current take. |
Checkpoints & Making Cuts to Your Video
Swipe Up | Good/Keep | Set Checkpoint
- Swipe up or tap the check to set a checkpoint
- Save your progress and keep the current segment
- Setting a checkpoint will make sure everything since the last swipe/checkpoint is included in your video
Swipe Down | Bad/Cut | Set Checkpoint
- Swipe down or tap the X to cut everything since the last checkpoint
- Timeline bar will turn red indicating that the segment will be cut
Standby/Resume Video
- Video segments that are set to standby will be cut
- Swipe left or tap the standby icon to start standby mode
- Swipe left again or tap the resume icon to resume
Timeline markers
- Swipe right to add a marker
- Tap the marker icon to change the color, label, or description
- Maker colors are supported in Premiere Pro and Davinci Resolve
- NOTE: Davinci Resolve you just run a script to set marker colors. Window->Scripts->SwitchTake-Color
Blooper Reel
- Swipe down and to the right to cut the current segment and add it to your blooper reel
Highlight Reel
|
- While recording tap the "STAR" icon to add to your clip highlight reel
- Give the highlight a name and choose how far back to create the highlight clip (15 sec, 30 sec, 1 min...)
- To activate the highlight reel, click the "Help/More" link at the bottom right of the session edit screen
| |
Streaming Segments
|
- While recording, name and create multiple segments from your video
- Segments are organized and added to the segments timeline so they are easy to find
- To activate streaming segments, click the "Help/More" link at the bottom right of the session edit screen
| |
Clip Color
- Tap a clip segment in the timeline bar to change the clip color
- Clip color is supported in Final Cut Pro and Davinci Resolve
- NOTE: Davinci Resolve you just run a script to set clip colors. Window->Scripts->SwitchTake-Color
Save Your Edit Session
- Tap the green "SAVE" button at the top right of the edit screen
- Open SwitchTake on your PC/Mac to import your rough-cut video sequence
Edit Sessions, Clip Management, and SwitchTake Director
The new recording screen has several options to manage and sequence your clips.
Rename Clip
- Set your clip name at the top of the screen in the SESSION / CLIP NAME FIELD
- Check the "RENAME CLIP" option below the start button
- When you generate your import timeline with SwitchTake PC/Mac you will be prompted to rename the video clip
Sequence & Scene
- Check the "SEQUENCE" option below the start button
- Enter a name for the sequence and set the scene #
- SwitchTake PC/Mac will add this clip to the sequence and order it based on the scene ID
Clip Tags
- Clip tags are used to organize and group your clips
- Check the "CLIP TAGS" option below the start button
- Enter tags separated by commas
- SwitchTake PC/Mac will group all clips with the same tag and generate an import sequence with all the clips together
|


